You are using an out of date browser. It may not display this or other websites correctly.
You should upgrade or use an alternative browser.
You should upgrade or use an alternative browser.
مو قشنگ
- شروع کننده موضوع ♘امیرحسین♞
- تاریخ شروع
♘امیرحسین♞
♘ مدیریت انجمن اسب ایران ♞
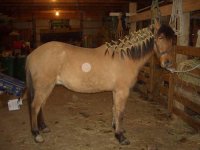
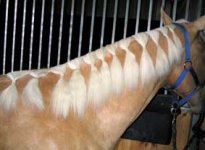
بافتن یال بلند برای مسابقات زیبایی
Key Braiding Skill:
French Braiding The Long Mane
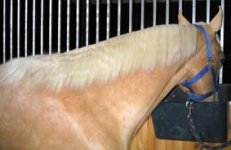
For those who show Arabians, Morgans, Andalusians, and other traditionally long-maned breeds, hunter and dressage classes can pose a major grooming challenge. Pulling the mane is an option only if you do not also show in classes where braiding is not appropriate. French braids are the usual compromise, but they tend to look like a compromise indeed, sagging down the neck and/ or falling out every time the horse stretches its head.
Although the short-comings of a French braid cannot entirely be overcome, there is a simple trick that will vastly improve both their appearance and lifespan. Follow closely, then grab your stepstool and your QuicBraid and practice, practice, practice.
Before you begin, the mane must be clean, soft, and free of tangles, mats, and foreign objects. I normally bathe Excalibur in Quic Silver before a show, followed by Quic Condition 1 on the mane and tail, and a very careful combing or picking out. Then we’re ready to braid.
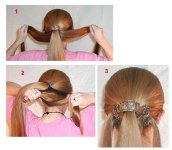
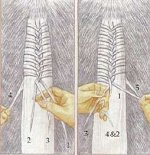
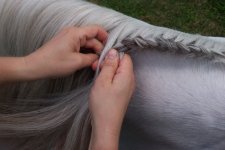
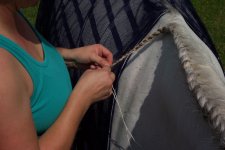
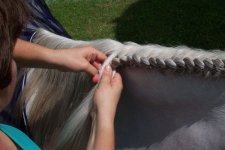
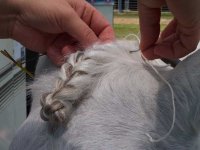
1-The braid starts immediately behind the bridle path, if your horse has one, or with the first section of hair not combed foreword into the forelock if he’s like my horse Excalibur (the model here) and does not. Spray QuicBraid on the top three to four inches of mane just before you begin, to make the hair easier to hold and reduce flyaway.
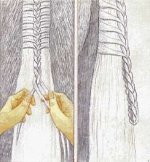
Separate the hair into three sections each about ½” wide. The first two passes are the same as an ordinary braid—left over center, then right over center. With the second crossing of the left strand, add a new section about ½” wide to the existing strand. Tug gently on the hair to make the whole braid as tight as possible against the crest.
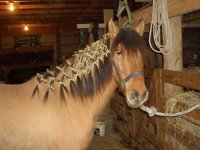
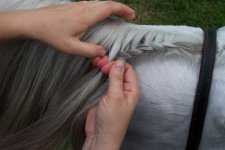
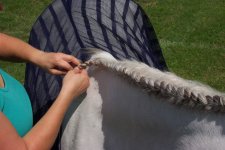
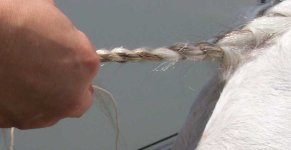
2-Each time the left side crosses over, add a new section of hair to the braid. Apply firm, steady pressure (don’t jerk!) to the braided portion to keep it snug. Apply more Quic Braid to the mane as needed.
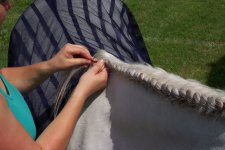
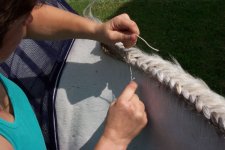
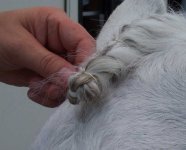
3-Now, here’s the trick to making the braid last! As you braid on down the neck, keep your HANDS CLOSE TO THE CREST AND NO FARTHER DOWN THE NECK THAN THE POINT FROM WHICH YOU ARE DRAWING NEW HAIR. Yes, it really is that simple. This hand position builds enough slack into the braid that it can move with the horse and not pull out.
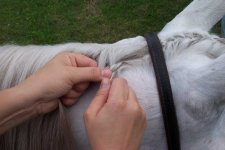
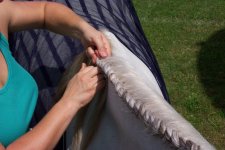
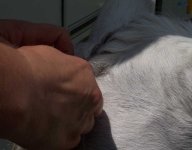
4-Notice here that I am actually pulling the braid (with my right hand) back up towards the horse’s ears—this is the thick part of his mane, where it takes more effort to keep the braid tight and to resist letting my hands move down and away from the crest. At this point the braid may ‘slouch’ or buckle slightly, this is okay as it is this slack that prevents the braid from pulling out.
French Braiding The Long Mane
For those who show Arabians, Morgans, Andalusians, and other traditionally long-maned breeds, hunter and dressage classes can pose a major grooming challenge. Pulling the mane is an option only if you do not also show in classes where braiding is not appropriate. French braids are the usual compromise, but they tend to look like a compromise indeed, sagging down the neck and/ or falling out every time the horse stretches its head.
Although the short-comings of a French braid cannot entirely be overcome, there is a simple trick that will vastly improve both their appearance and lifespan. Follow closely, then grab your stepstool and your QuicBraid and practice, practice, practice.
Before you begin, the mane must be clean, soft, and free of tangles, mats, and foreign objects. I normally bathe Excalibur in Quic Silver before a show, followed by Quic Condition 1 on the mane and tail, and a very careful combing or picking out. Then we’re ready to braid.
1-The braid starts immediately behind the bridle path, if your horse has one, or with the first section of hair not combed foreword into the forelock if he’s like my horse Excalibur (the model here) and does not. Spray QuicBraid on the top three to four inches of mane just before you begin, to make the hair easier to hold and reduce flyaway.
Separate the hair into three sections each about ½” wide. The first two passes are the same as an ordinary braid—left over center, then right over center. With the second crossing of the left strand, add a new section about ½” wide to the existing strand. Tug gently on the hair to make the whole braid as tight as possible against the crest.
2-Each time the left side crosses over, add a new section of hair to the braid. Apply firm, steady pressure (don’t jerk!) to the braided portion to keep it snug. Apply more Quic Braid to the mane as needed.
3-Now, here’s the trick to making the braid last! As you braid on down the neck, keep your HANDS CLOSE TO THE CREST AND NO FARTHER DOWN THE NECK THAN THE POINT FROM WHICH YOU ARE DRAWING NEW HAIR. Yes, it really is that simple. This hand position builds enough slack into the braid that it can move with the horse and not pull out.
4-Notice here that I am actually pulling the braid (with my right hand) back up towards the horse’s ears—this is the thick part of his mane, where it takes more effort to keep the braid tight and to resist letting my hands move down and away from the crest. At this point the braid may ‘slouch’ or buckle slightly, this is okay as it is this slack that prevents the braid from pulling out.
پیوست ها
♘امیرحسین♞
♘ مدیریت انجمن اسب ایران ♞
پاسخ : بافتن یال بلند برای مسابقات زیبایی
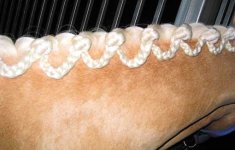
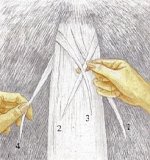
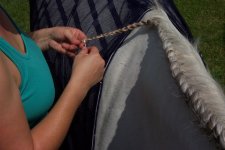
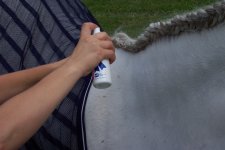
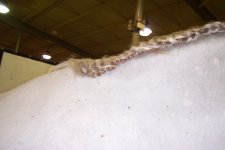
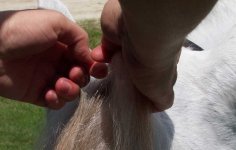
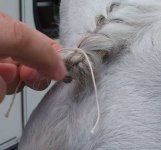
1-Here I am ¾ of the way down the neck, in the thickest part of his mane. The braid has gotten fatter, but it’s still tight along the crest of the neck, and my hands are still even with the new hair being added to the braid.
2-A slightly different camera angle shows how the braid stays close to the crest all the way down.
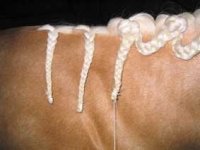
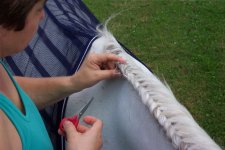
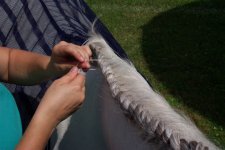
3-Now I’ve reached the withers, and am adding the last hair to the braid. If your horse has short hairs at the withers, it is better to leave them out of the French braid, as they will pull out anyway. They can be tucked under the saddle pad, or put up in a single small braid of their own.
4-After you’ve added the last hairs to the braid, continue braiding what’s left into a ‘pigtail’.
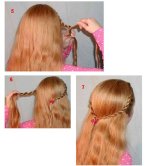
5-Add a piece of yarn to the pigtail, following the directions in the Key Skill article, and continue braiding, stopping ½ to ¾” before the end of the hair (or when it gets too thin for a secure braid).
6-Tie off the end of the braided pigtail with the loop knot shown in the Key Skill article. Do NOT cut the ends of the string.
2-A slightly different camera angle shows how the braid stays close to the crest all the way down.
3-Now I’ve reached the withers, and am adding the last hair to the braid. If your horse has short hairs at the withers, it is better to leave them out of the French braid, as they will pull out anyway. They can be tucked under the saddle pad, or put up in a single small braid of their own.
4-After you’ve added the last hairs to the braid, continue braiding what’s left into a ‘pigtail’.
5-Add a piece of yarn to the pigtail, following the directions in the Key Skill article, and continue braiding, stopping ½ to ¾” before the end of the hair (or when it gets too thin for a secure braid).
6-Tie off the end of the braided pigtail with the loop knot shown in the Key Skill article. Do NOT cut the ends of the string.
پیوست ها
♘امیرحسین♞
♘ مدیریت انجمن اسب ایران ♞
پاسخ : بافتن یال بلند برای مسابقات زیبایی
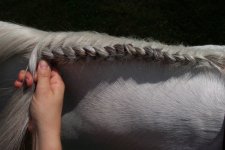
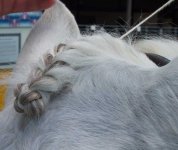
1-Fold the pigtail portion back and tuck it under the French braid. Pass one end of the string up through the braid, bring the other end below it, and tie off in a square knot.
2-Here I am pulling the square knot tight with a firm tug on the ends of the string. It never hurts to put an extra knot or two here for security.
3-Run additional pieces of yarn or string around the pigtail and the main braid every inch or two to prevent the pigtail from drooping. This braid was done in a hurry with only two extra ties, normally I’d use at least four. There’s no such thing as too many ties on this part of the braid.
4-After securing your knots, snip the ends of the strings close to the braid.
5-Spray wispy ends with QuicBraid and press or work them down into the braid for a tidy appearance.
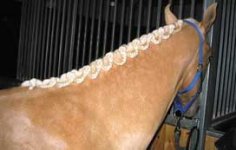
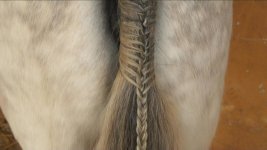
6-Here’s the finished product of the braid job shown above—four hours and two divisions of working hunters after I put it in. If I had another class, I’d slick the loose hairs down with more Quic Braid.Another example of a ‘used’ braid. The slight twisting and rippling is due to the slack built in by my hand position, and it has allowed the braid to stay tight and tidy through a lot of movement.
The French braid is easily removed by using a seam ripper to cut each piece of yarn or string, then gently unraveling the braid with your fingers.
2-Here I am pulling the square knot tight with a firm tug on the ends of the string. It never hurts to put an extra knot or two here for security.
3-Run additional pieces of yarn or string around the pigtail and the main braid every inch or two to prevent the pigtail from drooping. This braid was done in a hurry with only two extra ties, normally I’d use at least four. There’s no such thing as too many ties on this part of the braid.
4-After securing your knots, snip the ends of the strings close to the braid.
5-Spray wispy ends with QuicBraid and press or work them down into the braid for a tidy appearance.
6-Here’s the finished product of the braid job shown above—four hours and two divisions of working hunters after I put it in. If I had another class, I’d slick the loose hairs down with more Quic Braid.Another example of a ‘used’ braid. The slight twisting and rippling is due to the slack built in by my hand position, and it has allowed the braid to stay tight and tidy through a lot of movement.
The French braid is easily removed by using a seam ripper to cut each piece of yarn or string, then gently unraveling the braid with your fingers.
پیوست ها
♘امیرحسین♞
♘ مدیریت انجمن اسب ایران ♞
بافتن کاکل
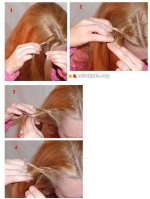
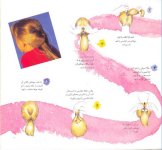
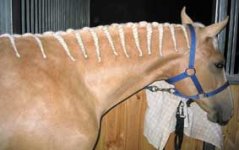
1-Long, thick forelocks are beautiful, but they can be a real challenge to braid for hunter, dressage, and formal classes. In most cases the best solution is a French braid. Unlike the French braided mane, for a forelock you’ll be adding hair from both sides.
Start by parting the forelock into three unequal sections. The majority of the hair should be in the center section, with each outer side made up only of the hairs that grow along the outer ¼” along the length from the bridle path (or part if there isn’t one) to where the hairs are no longer attached.
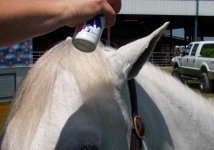
If you horse doesn’t mind, spray Quic Braid on the forelock, with special attention to the outside hairs. Be careful not to get spray in the eyes. Many horses don’t like a sprayer in the face (who can blame them)—if yours is one, spray the Quic Braid on your fingers and smooth it onto the forelock hair.
2-The trick to making an attractive and tight French braid in a thick forelock is to braid only the outside hairs, otherwise the braid quickly gets too bulky. You can start on either side, I start with the right so if you prefer the left just reverse these instructions. Take a small section of side hair from the farthest back portion of the right side, next to the bridle path. Bring it diagonally across the forelock, where it will become the first ‘center’ strand. Then take a small section from the left side, cross over, repeat with a new section from the right. At this point you should have established three strands of braid.
3-Each time you make a crossover, pick up another small section of hair from the side and add it to the braid, tugging gently to keep the whole thing smooth. This braid would look better if I used smaller sections, so that there would be more crossovers. Continue braiding in this manner until you reach the end of the rooted portion of the forelock.
4-At the end of the rooted portion, divide the big center section of hair into three equal parts and add them to the three sections of braid. Then continue braiding normally to make a pigtail. Add a string to the braid and tie it off as shown in the Key Skill article. For best results, keep your hands closer to the head than mine are here.
Pro trick: If the pigtail portion of the braid is a lot longer than the French braided portion, experiment with stopping the braid several inches before you get to the bottom. This makes it easier to fold the pigtail up under the French braid, as shown below.
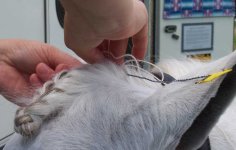
5-Now insert a pull-through tool into the French braid, starting as close to the bridle path as possible. My tool here is made of thin twisted wire, so it slides easily down the length of the French braid to emerge at the front.
6-Pass the two tails of the yarn or string through the loop in the pull through that sticks out of the braid, then gently pull the tool upwards, folding the pigtail up under the French braided portion. If the forelock is very long, be careful not to pull too far, else you may end up with the pigtail sticking out at the top. If that happens, use gentle fingers at the fold to pull it back the way it came.
Start by parting the forelock into three unequal sections. The majority of the hair should be in the center section, with each outer side made up only of the hairs that grow along the outer ¼” along the length from the bridle path (or part if there isn’t one) to where the hairs are no longer attached.
If you horse doesn’t mind, spray Quic Braid on the forelock, with special attention to the outside hairs. Be careful not to get spray in the eyes. Many horses don’t like a sprayer in the face (who can blame them)—if yours is one, spray the Quic Braid on your fingers and smooth it onto the forelock hair.
2-The trick to making an attractive and tight French braid in a thick forelock is to braid only the outside hairs, otherwise the braid quickly gets too bulky. You can start on either side, I start with the right so if you prefer the left just reverse these instructions. Take a small section of side hair from the farthest back portion of the right side, next to the bridle path. Bring it diagonally across the forelock, where it will become the first ‘center’ strand. Then take a small section from the left side, cross over, repeat with a new section from the right. At this point you should have established three strands of braid.
3-Each time you make a crossover, pick up another small section of hair from the side and add it to the braid, tugging gently to keep the whole thing smooth. This braid would look better if I used smaller sections, so that there would be more crossovers. Continue braiding in this manner until you reach the end of the rooted portion of the forelock.
4-At the end of the rooted portion, divide the big center section of hair into three equal parts and add them to the three sections of braid. Then continue braiding normally to make a pigtail. Add a string to the braid and tie it off as shown in the Key Skill article. For best results, keep your hands closer to the head than mine are here.
Pro trick: If the pigtail portion of the braid is a lot longer than the French braided portion, experiment with stopping the braid several inches before you get to the bottom. This makes it easier to fold the pigtail up under the French braid, as shown below.
5-Now insert a pull-through tool into the French braid, starting as close to the bridle path as possible. My tool here is made of thin twisted wire, so it slides easily down the length of the French braid to emerge at the front.
6-Pass the two tails of the yarn or string through the loop in the pull through that sticks out of the braid, then gently pull the tool upwards, folding the pigtail up under the French braided portion. If the forelock is very long, be careful not to pull too far, else you may end up with the pigtail sticking out at the top. If that happens, use gentle fingers at the fold to pull it back the way it came.
پیوست ها
♘امیرحسین♞
♘ مدیریت انجمن اسب ایران ♞
پاسخ : بافتن کاکل
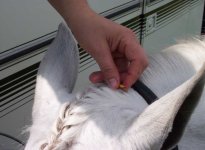
1-Lay one end of the string on each side of the forelock, then insert the pull through tool horizontally as close to the head as possible, slip the string in, and pull it back through.
2-Repeat on the other side, tugging gently to tighten the strings without pulling the hair out of place. Tie the two ends in a tight square knot on top of the braid, and snip off the ends of the strings.
3-Reinforce the braid by passing additional pieces of string or yarn horizontally through it, as close to the head as possible, and tying them in tight square knots on top of the braid. Also wrap a string around the knob at the front (where the braid folded to tuck under) and tie it off tightly. The thicker the hair and the longer you need the braid to last, the more extra ties should be added.
4-The finished product, in need of a bit more Quic Braid to help keep the stray fuzzy hairs down.
To remove this braid, use a seam ripper to carefully cut the threads, starting with the horizontal strands. Once you’ve cut out the knot nearest the bridlepath, gently work the pigtail out from under the braid. Cut the knot on the end of it, then carefully unravel the braid using your fingers. Be patient when removing the braid, as rough pulling will tear out hair, damaging both the forelock and your horse’s tolerance for being braided.
پیوست ها

♘امیرحسین♞
♘ مدیریت انجمن اسب ایران ♞


علی واحدی
Active member
امیر حسین جان میدونستی که برای بافتن موی انسان(خانها) بصورت اسب مشکیه 200000تومان میگیرن؟؟؟؟؟؟؟؟؟؟؟!!!!!!!!!!!!!!!!!!!!!!!!!!!!!!♘ امیرحسین ♞ گفت:اینم ادامه مدلها
ولی حقیقتا زیباست.
ناشناس
Active member
برادر جان دست ماهم بگیر (البته خانم زارع هم دم اسب و قشنگ میبافه)baradar گفت:این پروشات متخصص یال و دم بافتنه. دقیقا مثل اسبهای پرش اروپا. قراره به منم یاد بده. البته امیدوارم. :-\ :-\
M