♘امیرحسین♞
♘ مدیریت انجمن اسب ایران ♞
This article involves two subjects that receive a lot of attention and controversy but are very important in many aspects of equine health care.
The relationship between massage and saddle fit.
Both of these are usually administered to the horse after he has become sore or has developed a problem. Being a massage therapist, I know first-hand how important alleviating pain can be and more recently I have developed the same passion in preventing it.
What do we need to look for in the horse to tell if his back is sore due to an improper saddle fit, or whether there are secondary hock issues, and possibly a training issue? The last two could take columns of their own and in future articles I will share my findings on those subjects as well.
When a therapist is called to look at a horse, the first question should be, "Has the veterinarian seen the horse for any conditions related to this issue?" If the answer is yes, we need to get a full history. If the answer is no, we need the history but also need to see the horse move in order to evaluate if the horse would be better off seeing the veterinarian first.
Back issues in a horse can be very acute and easily recognized or, in the case of a horse that is stoic, may be hidden in a number of ways. As mentioned earlier, a telltale sign that the horse may be uncomfortable in his movement. Does he suddenly go with his head in the air, not want to go in a frame? Is he trying to get away from you or bracing when you come at him with the saddle? Or does he act ‘girthy’? There are in fact conditions that will make the horse girthy but in many cases, I have found that the pressure of the ill-fitting saddle when being tightened on the horse's back is enough to make him act in such a manner. Many times we tighten the girth too tight and pinch the Serratus Thoracis. This muscle is located deep on the horse’s trunk behind the elbow region. Horses have shown shoulder ‘lameness’ from this. The horse can’t properly extend the foreleg and this will result in a stilted or choppy gait. Ideally, the girth should be a couple finger widths behind the elbow and started out in the ride just snug. As you warm up and he starts getting into his rhythm and breathing pattern, take a minute to check the girth and tighten it at this time. I would say that in 80% or more cases when a client says his horse is girthy, I find the saddle not fitting the way it should.
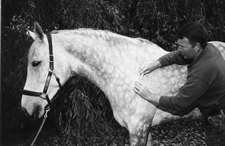
Picture of horse c-stroke technique
The C-Stroke
After seeing the horse move, it is time to do a brief palpation of the horses back. DON'T go by the first reaction you get to these tests. The horse will almost always flinch on the first pass. Just as we do, the horse has reaction points, which are easy to locate
I prefer to start by running my fingers down the horse’s spine with moderate pressure. It is normal for them to dip just a bit. If on the second or subsequent passes, the horse ducks away or becomes agitated, it could be indicative of a back problem. Some touchy, thin-skinned horses will react this way and show no other signs of discomfort. This is why it is imperative to know your horse and the way he reacts to touch.
Next, look at the saddle on the horse. If you lift the skirt you will see the stirrup bars where you hook your leathers on. Check under this exact area by first running your hand over it lightly and then giving a slow but deliberate squeeze to the same spot on both sides simultaneously. If the horse raises his head sharply and inverts his back, the saddle may be pinching his Trapezius. This muscle raises the shoulder and moves it forward and back. The other muscle that is superficial that would be pinched is the Latissimus Dorsi. This muscle flexes the shoulder and draws the foreleg back. As we go deeper still, the Spinalis and Longissimus Dorsi can be affected. They extend the back and neck.
If the saddle is too wide, it may also be evident that it is resting on the horses wither. This can be indicated visually by looking and the way the saddle fits (without padding). If you are riding and you are posting, take a finger and put it under the pommel on the downward. If your finger gets pinched tight, imagine what the horse is feeling. You may also see a patch of white hair on the wither that wasn’t there before. This could be from the saddle creating pressure to the area, from not lifting the pads up into the pommel or from a blanket that rubs. All these must be looked at.
Now, let’s look at the center of the saddle. Feel between the horse's back and the panels. Is there a big gap causing bridging of the saddle? Is it very snug to the horses back? Or is there just the slightest hint of a bridge so that the horse's back can meet the spring of the saddle tree the way it is intended to?
Step back for a moment and look at how the saddle is resting on the horse. Is the lowest part of the seat parallel to the ground? Does the rear of the panels seem compressed or too high? These are the visual signs to check for. Remember, the way many saddles are designed, the cantle or back of the saddle is higher than the front or pommel. The area in which your seat bones come into contact with the saddle should be level with the ground and there should be no rocking motion when you apply alternating pressure to the pommel and cantle.
At this point I’d like to mention and thank a gentleman from Connecticut named Gary Severson a.k.a. Saddle Doctor. Working with Gary over the years has taught us both the benefits of each other's work. We have had a fortunate chain of events that have allowed us to work together and with other equine professionals in clinic settings, which have proven the benefits of all adjunctive therapies, and how well they work with conventional medicine. It is Gary’s work that has inspired me to apprentice with him and learn to adjust the saddles I come into contact with, on a daily basis, that make the horse uncomfortable.
Treating the areas
For the most part massage can make the sore back much more comfortable. Before we look at a couple of simple applications to the back (that are to be performed on both sides of the horse) I would like to reiterate the importance of properly fitted tack. A common trap that the owner can fall into is to have the horse treated time and time again without ever getting to the cause of the problem. This is both costly and frustrating. We as owners and therapists should want to try to break the cycle of events that lead to repetitive soreness.
Effleurage… is a full flat-handed stroke that is delivered in a long gliding motion along the muscles. It is used for warming the area up and to let the horse get used to your touch.
First, we would want to effleurage the horse’s neck, shoulder, wither area and back all the way to the gluteals.
Skin Rolling… is a technique that focuses on the fascia or connective tissue. We want to administer this application slowly and within the horse’s tolerance.
Skin rolling
Once the horse has accepted the initial touch of effleurage, you can gradually start to lift the skin off the shoulder. This is applied in a manner that does not pinch the horse. Between your thumb and first two fingers of each hand, lift the skin and the tissue under the skin. The horse may act a little startled at first but be patient - every horse I have treated with this technique eventually gives in and enjoys it. After you have the skin and connective tissue in your fingers, gradually start to roll it as if you are rolling a thick pencil between your thumbs and fingers. This can be applied to the length and width of the shoulder.
Now that you are getting comfortable with this technique: working on the left side of the horse, place your right hand, fingers up and flat, on the horse's back near the wither. Next, take your right thumb pad and put it on the horse’s skin.
Place your left hand flat on the side of the horse's wither, to the left of your right thumb. Position your left hand so that it forms a ‘C’.
The C stroke
Apply pressure to the horse with your right thumb, move your left hand slowly toward your right hand. You should start to see the skin under your thumb start to follow the direction you are going. Without breaking contact with the horse, you should be able to press and release and find a comfortable rhythm in this application. You should be able to apply this along the back and wither area until you get to the area of the Spinalis Dorsi and Longissimus. The tissue will usually get too dense from here back to continue on.
These last two applications are a nice lead-in to the deeper work to follow. Make contact with the area of the horse that corresponds to the stirrup bars. Hold your left forefinger there. Now, take your right forefinger and locate the Tuber Coxae (this is the bony prominence of the hip that is incorrectly commonly referred to as the point of the hip).
In that space between these two landmarks, imagine a line from point to point, or it might help you to trace your finger against the way the hair grows. This should leave a line for you to follow. This line should also correspond to the borders of the Longissimus and Iliocostalis (the two long muscles of the back).
Slowly, take your fingertips and run them across the side of the horse over his ribs. You should feel each rib and, more importantly, the spaces between. Try to visualize where the saddle sits from front to back and concentrate on this area. Starting where the ribs end near the abdomen (obliques) trace up between each set of ribs and stop when you get to that line you drew. These are where you will locate the (approximately 8) points to treat.
Direct Pressure… is applied SLOWLY and with moderate to deep pressure. It can be applied with the fingers, thumbs or elbow. In this case, we will hold the points from 30-60 seconds or until we feel the muscle release. It is very common to see and feel the horse’s back spasm to this pressure. If this occurs, back off with the pressure and slowly go back to just the point where the spasm occurred. This is the depth that we will want to hold for the 30-60 seconds.
Start at the front and work your way back. As you get toward the end of where the saddle would rest, you might feel a hard ‘knot’. This is not uncommon. (In cadavers, I have seen tissue that almost looks like a callus from where trauma has been induced to the horses back).
If your horse gets uncomfortable at any point with your touch, don’t worry. Your inexperience will soon turn to something that they will grow to enjoy and look for.
I have to say that many of the clients I have worked with and taught this little sequence to have noticed much improvement.
Take your time and listen to your horse.
The relationship between massage and saddle fit.
Both of these are usually administered to the horse after he has become sore or has developed a problem. Being a massage therapist, I know first-hand how important alleviating pain can be and more recently I have developed the same passion in preventing it.
What do we need to look for in the horse to tell if his back is sore due to an improper saddle fit, or whether there are secondary hock issues, and possibly a training issue? The last two could take columns of their own and in future articles I will share my findings on those subjects as well.
When a therapist is called to look at a horse, the first question should be, "Has the veterinarian seen the horse for any conditions related to this issue?" If the answer is yes, we need to get a full history. If the answer is no, we need the history but also need to see the horse move in order to evaluate if the horse would be better off seeing the veterinarian first.
Back issues in a horse can be very acute and easily recognized or, in the case of a horse that is stoic, may be hidden in a number of ways. As mentioned earlier, a telltale sign that the horse may be uncomfortable in his movement. Does he suddenly go with his head in the air, not want to go in a frame? Is he trying to get away from you or bracing when you come at him with the saddle? Or does he act ‘girthy’? There are in fact conditions that will make the horse girthy but in many cases, I have found that the pressure of the ill-fitting saddle when being tightened on the horse's back is enough to make him act in such a manner. Many times we tighten the girth too tight and pinch the Serratus Thoracis. This muscle is located deep on the horse’s trunk behind the elbow region. Horses have shown shoulder ‘lameness’ from this. The horse can’t properly extend the foreleg and this will result in a stilted or choppy gait. Ideally, the girth should be a couple finger widths behind the elbow and started out in the ride just snug. As you warm up and he starts getting into his rhythm and breathing pattern, take a minute to check the girth and tighten it at this time. I would say that in 80% or more cases when a client says his horse is girthy, I find the saddle not fitting the way it should.
Picture of horse c-stroke technique
The C-Stroke
After seeing the horse move, it is time to do a brief palpation of the horses back. DON'T go by the first reaction you get to these tests. The horse will almost always flinch on the first pass. Just as we do, the horse has reaction points, which are easy to locate
I prefer to start by running my fingers down the horse’s spine with moderate pressure. It is normal for them to dip just a bit. If on the second or subsequent passes, the horse ducks away or becomes agitated, it could be indicative of a back problem. Some touchy, thin-skinned horses will react this way and show no other signs of discomfort. This is why it is imperative to know your horse and the way he reacts to touch.
Next, look at the saddle on the horse. If you lift the skirt you will see the stirrup bars where you hook your leathers on. Check under this exact area by first running your hand over it lightly and then giving a slow but deliberate squeeze to the same spot on both sides simultaneously. If the horse raises his head sharply and inverts his back, the saddle may be pinching his Trapezius. This muscle raises the shoulder and moves it forward and back. The other muscle that is superficial that would be pinched is the Latissimus Dorsi. This muscle flexes the shoulder and draws the foreleg back. As we go deeper still, the Spinalis and Longissimus Dorsi can be affected. They extend the back and neck.
If the saddle is too wide, it may also be evident that it is resting on the horses wither. This can be indicated visually by looking and the way the saddle fits (without padding). If you are riding and you are posting, take a finger and put it under the pommel on the downward. If your finger gets pinched tight, imagine what the horse is feeling. You may also see a patch of white hair on the wither that wasn’t there before. This could be from the saddle creating pressure to the area, from not lifting the pads up into the pommel or from a blanket that rubs. All these must be looked at.
Now, let’s look at the center of the saddle. Feel between the horse's back and the panels. Is there a big gap causing bridging of the saddle? Is it very snug to the horses back? Or is there just the slightest hint of a bridge so that the horse's back can meet the spring of the saddle tree the way it is intended to?
Step back for a moment and look at how the saddle is resting on the horse. Is the lowest part of the seat parallel to the ground? Does the rear of the panels seem compressed or too high? These are the visual signs to check for. Remember, the way many saddles are designed, the cantle or back of the saddle is higher than the front or pommel. The area in which your seat bones come into contact with the saddle should be level with the ground and there should be no rocking motion when you apply alternating pressure to the pommel and cantle.
At this point I’d like to mention and thank a gentleman from Connecticut named Gary Severson a.k.a. Saddle Doctor. Working with Gary over the years has taught us both the benefits of each other's work. We have had a fortunate chain of events that have allowed us to work together and with other equine professionals in clinic settings, which have proven the benefits of all adjunctive therapies, and how well they work with conventional medicine. It is Gary’s work that has inspired me to apprentice with him and learn to adjust the saddles I come into contact with, on a daily basis, that make the horse uncomfortable.
Treating the areas
For the most part massage can make the sore back much more comfortable. Before we look at a couple of simple applications to the back (that are to be performed on both sides of the horse) I would like to reiterate the importance of properly fitted tack. A common trap that the owner can fall into is to have the horse treated time and time again without ever getting to the cause of the problem. This is both costly and frustrating. We as owners and therapists should want to try to break the cycle of events that lead to repetitive soreness.
Effleurage… is a full flat-handed stroke that is delivered in a long gliding motion along the muscles. It is used for warming the area up and to let the horse get used to your touch.
First, we would want to effleurage the horse’s neck, shoulder, wither area and back all the way to the gluteals.
Skin Rolling… is a technique that focuses on the fascia or connective tissue. We want to administer this application slowly and within the horse’s tolerance.
Skin rolling
Once the horse has accepted the initial touch of effleurage, you can gradually start to lift the skin off the shoulder. This is applied in a manner that does not pinch the horse. Between your thumb and first two fingers of each hand, lift the skin and the tissue under the skin. The horse may act a little startled at first but be patient - every horse I have treated with this technique eventually gives in and enjoys it. After you have the skin and connective tissue in your fingers, gradually start to roll it as if you are rolling a thick pencil between your thumbs and fingers. This can be applied to the length and width of the shoulder.
Now that you are getting comfortable with this technique: working on the left side of the horse, place your right hand, fingers up and flat, on the horse's back near the wither. Next, take your right thumb pad and put it on the horse’s skin.
Place your left hand flat on the side of the horse's wither, to the left of your right thumb. Position your left hand so that it forms a ‘C’.
The C stroke
Apply pressure to the horse with your right thumb, move your left hand slowly toward your right hand. You should start to see the skin under your thumb start to follow the direction you are going. Without breaking contact with the horse, you should be able to press and release and find a comfortable rhythm in this application. You should be able to apply this along the back and wither area until you get to the area of the Spinalis Dorsi and Longissimus. The tissue will usually get too dense from here back to continue on.
These last two applications are a nice lead-in to the deeper work to follow. Make contact with the area of the horse that corresponds to the stirrup bars. Hold your left forefinger there. Now, take your right forefinger and locate the Tuber Coxae (this is the bony prominence of the hip that is incorrectly commonly referred to as the point of the hip).
In that space between these two landmarks, imagine a line from point to point, or it might help you to trace your finger against the way the hair grows. This should leave a line for you to follow. This line should also correspond to the borders of the Longissimus and Iliocostalis (the two long muscles of the back).
Slowly, take your fingertips and run them across the side of the horse over his ribs. You should feel each rib and, more importantly, the spaces between. Try to visualize where the saddle sits from front to back and concentrate on this area. Starting where the ribs end near the abdomen (obliques) trace up between each set of ribs and stop when you get to that line you drew. These are where you will locate the (approximately 8) points to treat.
Direct Pressure… is applied SLOWLY and with moderate to deep pressure. It can be applied with the fingers, thumbs or elbow. In this case, we will hold the points from 30-60 seconds or until we feel the muscle release. It is very common to see and feel the horse’s back spasm to this pressure. If this occurs, back off with the pressure and slowly go back to just the point where the spasm occurred. This is the depth that we will want to hold for the 30-60 seconds.
Start at the front and work your way back. As you get toward the end of where the saddle would rest, you might feel a hard ‘knot’. This is not uncommon. (In cadavers, I have seen tissue that almost looks like a callus from where trauma has been induced to the horses back).
If your horse gets uncomfortable at any point with your touch, don’t worry. Your inexperience will soon turn to something that they will grow to enjoy and look for.
I have to say that many of the clients I have worked with and taught this little sequence to have noticed much improvement.
Take your time and listen to your horse.